
DDoS Attacks continued to grow in 2020 and beyond as COVID-19 drove organizations to shift everything to the web from learning to healthcare. As a result of this tumultuous year, attacks have grown in size and intensity. These attacks directly target business systems and individuals and could potentially lead to substantial financial and personal losses. A common strategy is to configure devices for RTBH to defend against DDoS attacks. However, this can take a lot of time and be prone to errors. Netography can help you automate RTBH so you can spend more time on the tasks that matter.
What is Remotely Triggered Black Hole Routing (RTBH)?
Remotely Triggered Black Hole Routing (RTBH) is a common technique for quickly dropping unwanted traffic before it reaches the network used by service providers and enterprises to protect against DDoS attacks. The concept is to block the traffic at the edge before it enters the protected network. Once malicious traffic is detected, RTBH quickly drops the malicious traffic from your devices. This article explains how to configure your devices and then set-up a rule in the Netography Portal to protect your network from DDoS Attacks.
With Netography, configuring your devices for RTBH is simple. We’ve taken the guesswork out to create an easy process to set up RTBH. While we understand many configurations are possible, we wanted to start with the most common and then continuously add more as we received additional requests. Please reach out if there are additional configurations you would like to see, and we will update this post.
Before you can use RTBH, you will need to create a BGP Peer. We have included step-by-step instructions. It’s also worth noting that RTBH can be added at any time and is not dependent on using and utilizing the Netography Network Detection & Response offering. Lastly, RTBH is just one of many ways that you can detect and block malicious traffic with Netography. With Netography, a traffic manager and blocklist manager is part of all licenses.
Create BGP Peer Configuration
Create BGP peers in the Netography Portal
https://fusion.netography.com/setup/devices
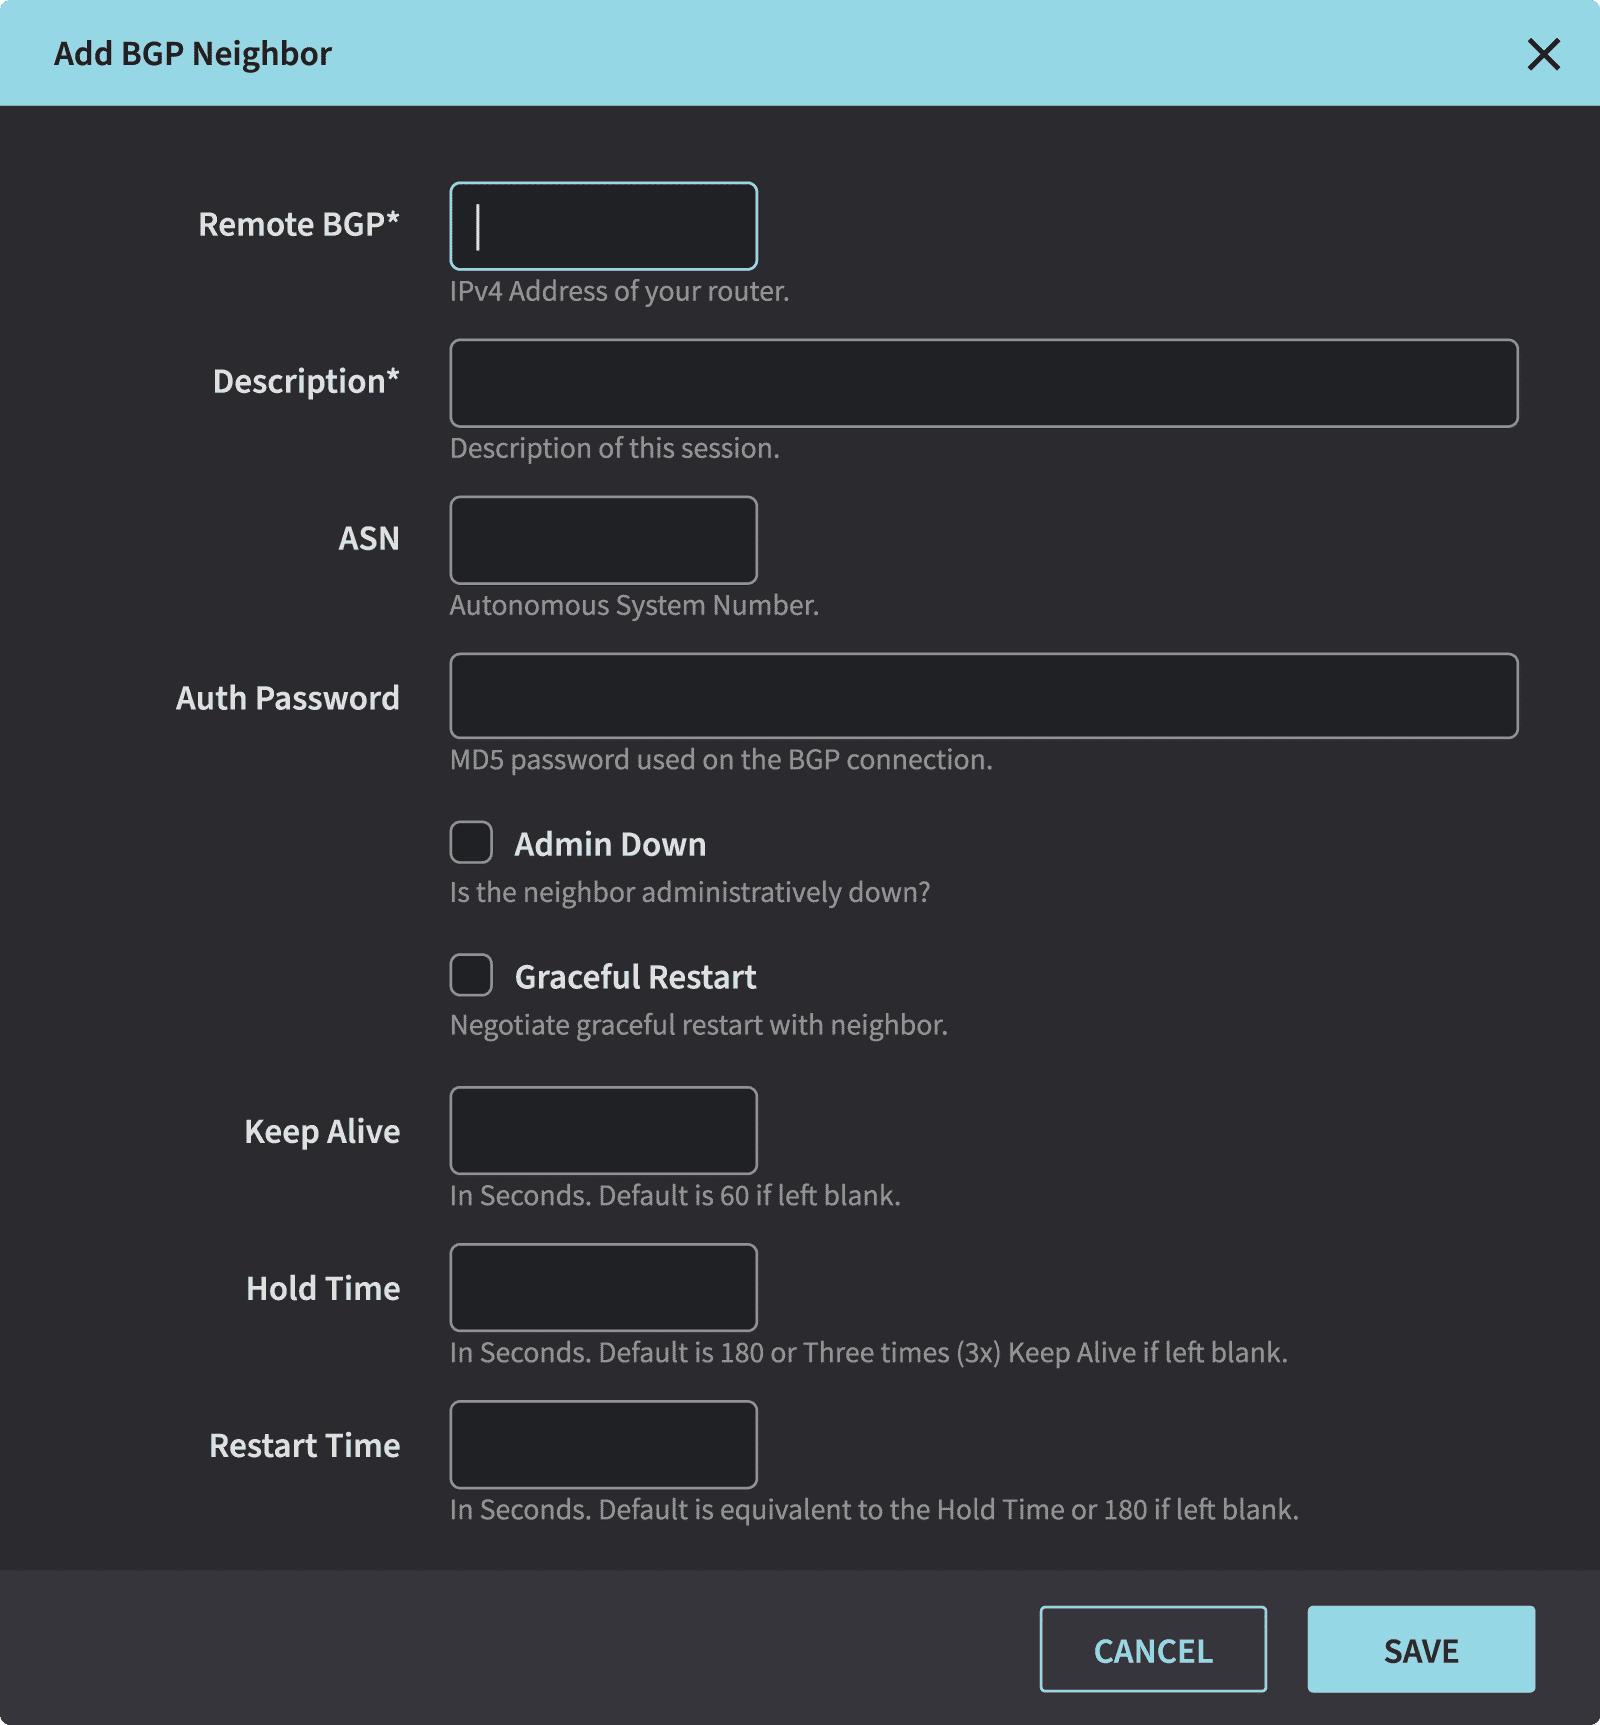
- Remote BGP – Your devices external IP address
- Description – A user friendly text to describe the peering session
- ASN – Autonomous System Number used for iBGP session
- Auth Password – A password used between the device and Netography to secure the connection
- Keep Alive – The number of seconds between KEEPALIVE messages
- Hold Time – The maximum number of seconds that can elapse between
- UPDATE and KEEPALIVE messages before the BGP session is torn down.
- Restart Time – The number of seconds to wait before a peer deletes stale routes. Requires a device to support graceful restart.
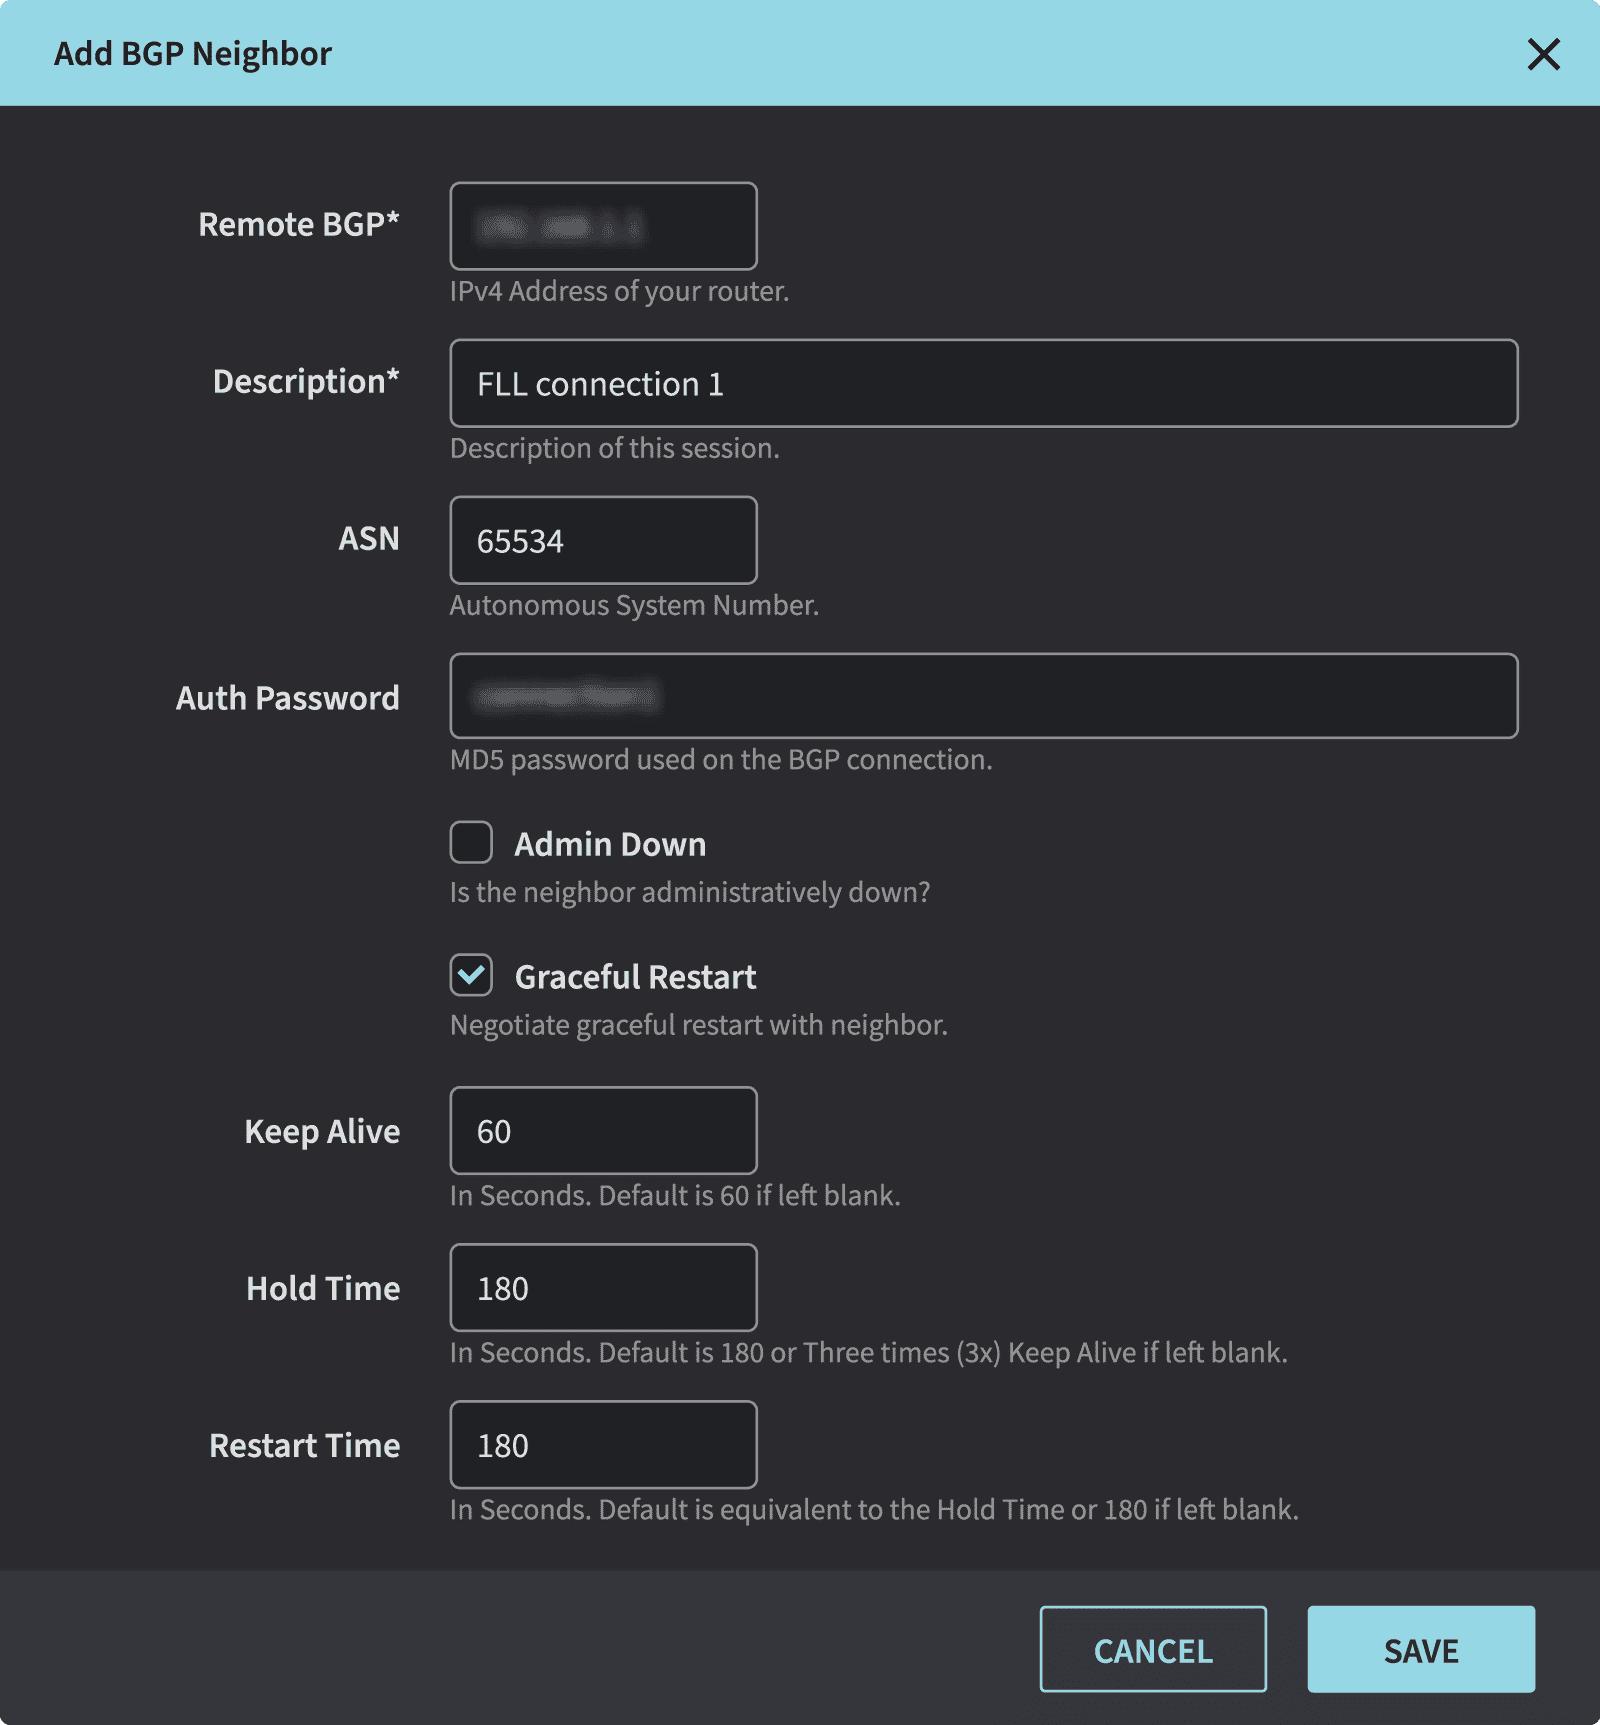
- Repeat form for multiple connections between device and Netography

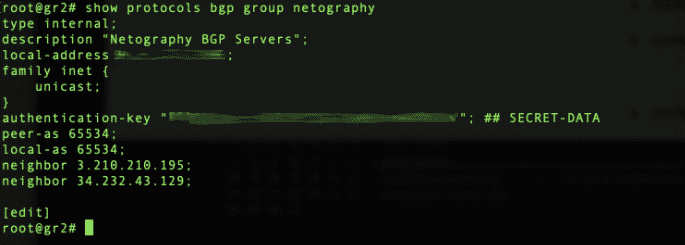
- Create router group configuration for netography (Juniper SRX320)
- set protocols bgp group netography type internal
- set protocols bgp group netography description “Netography BGP Servers”
- set protocols bgp group netography peer-as 65534
- set protocols bgp group netography local-as 65534
- set protocols bgp group netography local-address 96.91.123.226
- set protocols bgp group netography family inet unicast
- set protocols bgp group netography authentication-key Sup3rS3cur3
- Create router configuration for each peer (Juniper SRX320)
- set protocols bgp group netography neighbor 3.210.210.195
- set protocols bgp group netography neighbor 34.232.43.129
- Complete route configuration (Juniper SRX320)
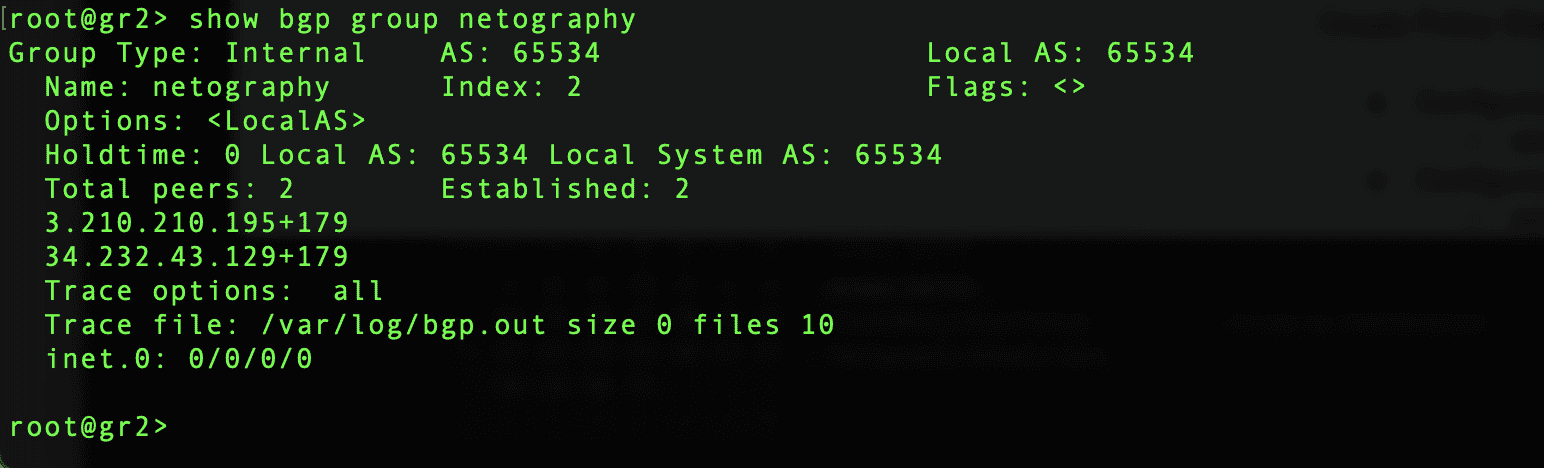

After you’ve completed the above, you are now ready to set up the plugin in Netography.
Create RTBH Integration
- Create router configuration (Juniper SRX320)
- Common RTBH configuration
- set policy-options policy-statement deny-all then reject
- set routing-options static route 192.0.2.1/32 discard
- Source-based RTBH
- set policy-options community SRC_BLACKHOLE members 65534:999
- set policy-options policy-statement srcblackhole term 1 to community [SRC_BLACKHOLE]
- set policy-options policy-statement srcblackhole term 1 then accept
- set protocols bgp group netography import [srcblackhole deny-all]
- Destination-based RTBH
- set policy-options community DST_BLACKHOLE members 65534:666
- set policy-options policy-statement dstblackhole term 1 to community [DST_BLACKHOLE]
- set policy-options policy-statement dstblackhole term 1 then accept
- set protocols bgp group netography import [dstblackhole deny-all]
- Common RTBH configuration
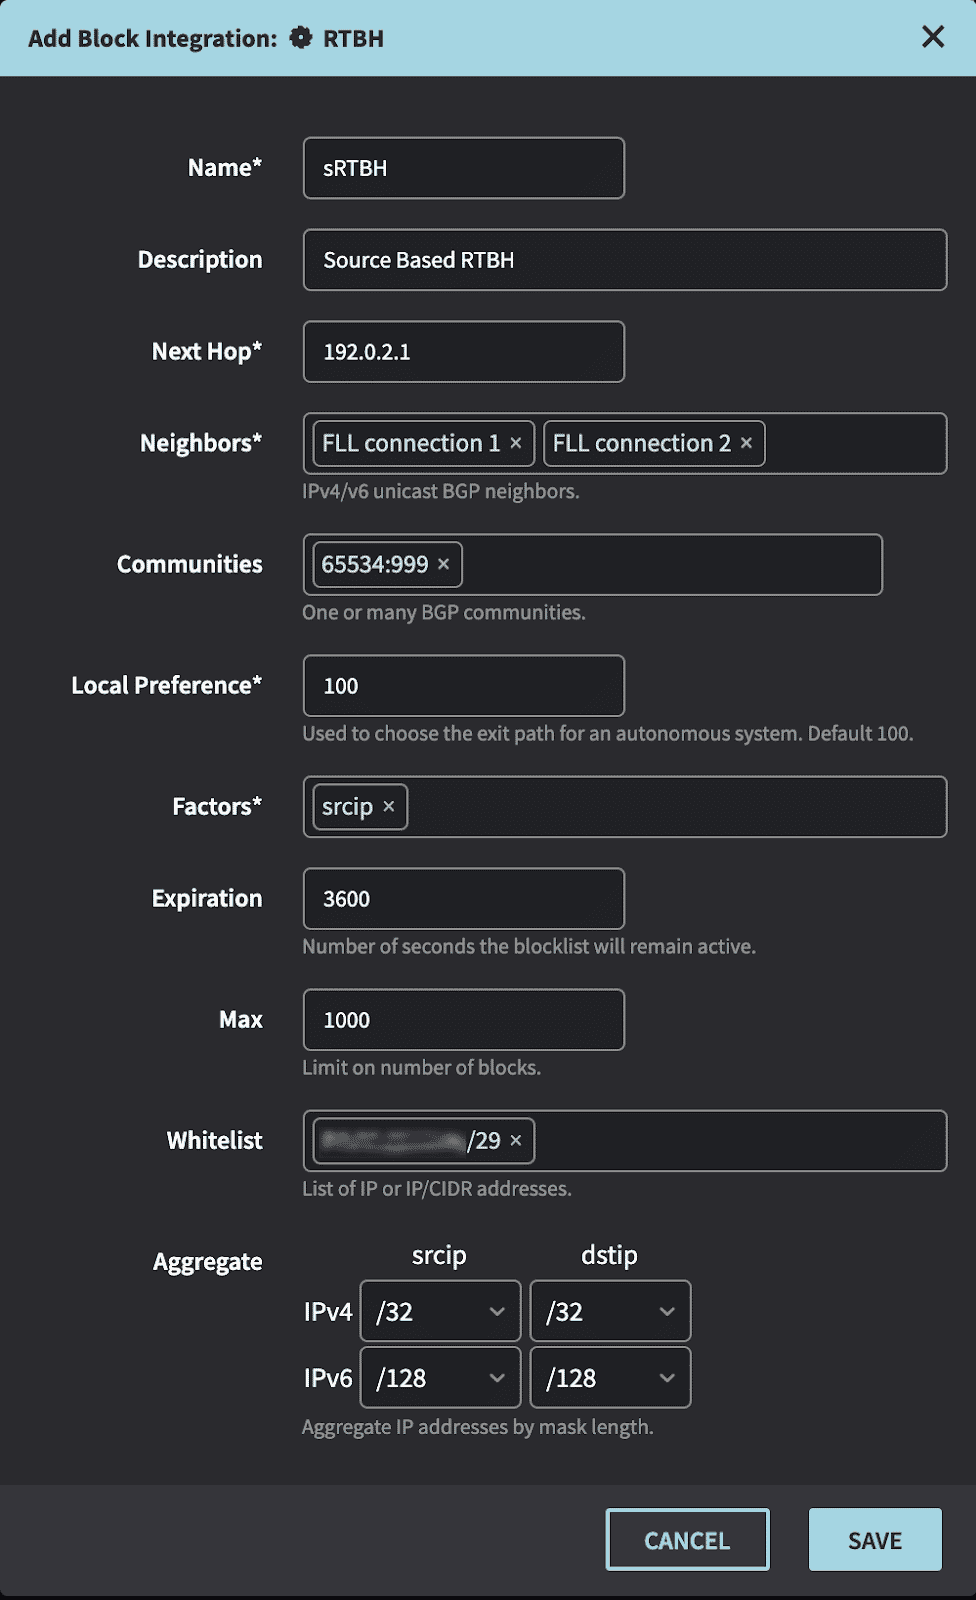
- Create Integration in the Netography portal
https://fusion.netography.com/ndr/integrations

- Name – A short description of the integration
- Description – A user friendly text to describe the integration
- Next Hop – The nexthop this route will be directed to
- Neighbors – BGP neighbors that routes will be announced to
- Communities – A 32-bit number that is included with the route
- Local Preference – The preference to include with the route
- Factors – The field (srcip or dstip) used in the matching flow records for the alert
- Expiration – The number of seconds an IP will be blocked before auto expiring
- Max – The maximum number of blocks that will be advertised to this peer at one time
- Whitelist – Any IP or IP/CIDR to skip advertising to the BGP neighbors
- Aggregate – The prefix length of a given IP to advertise
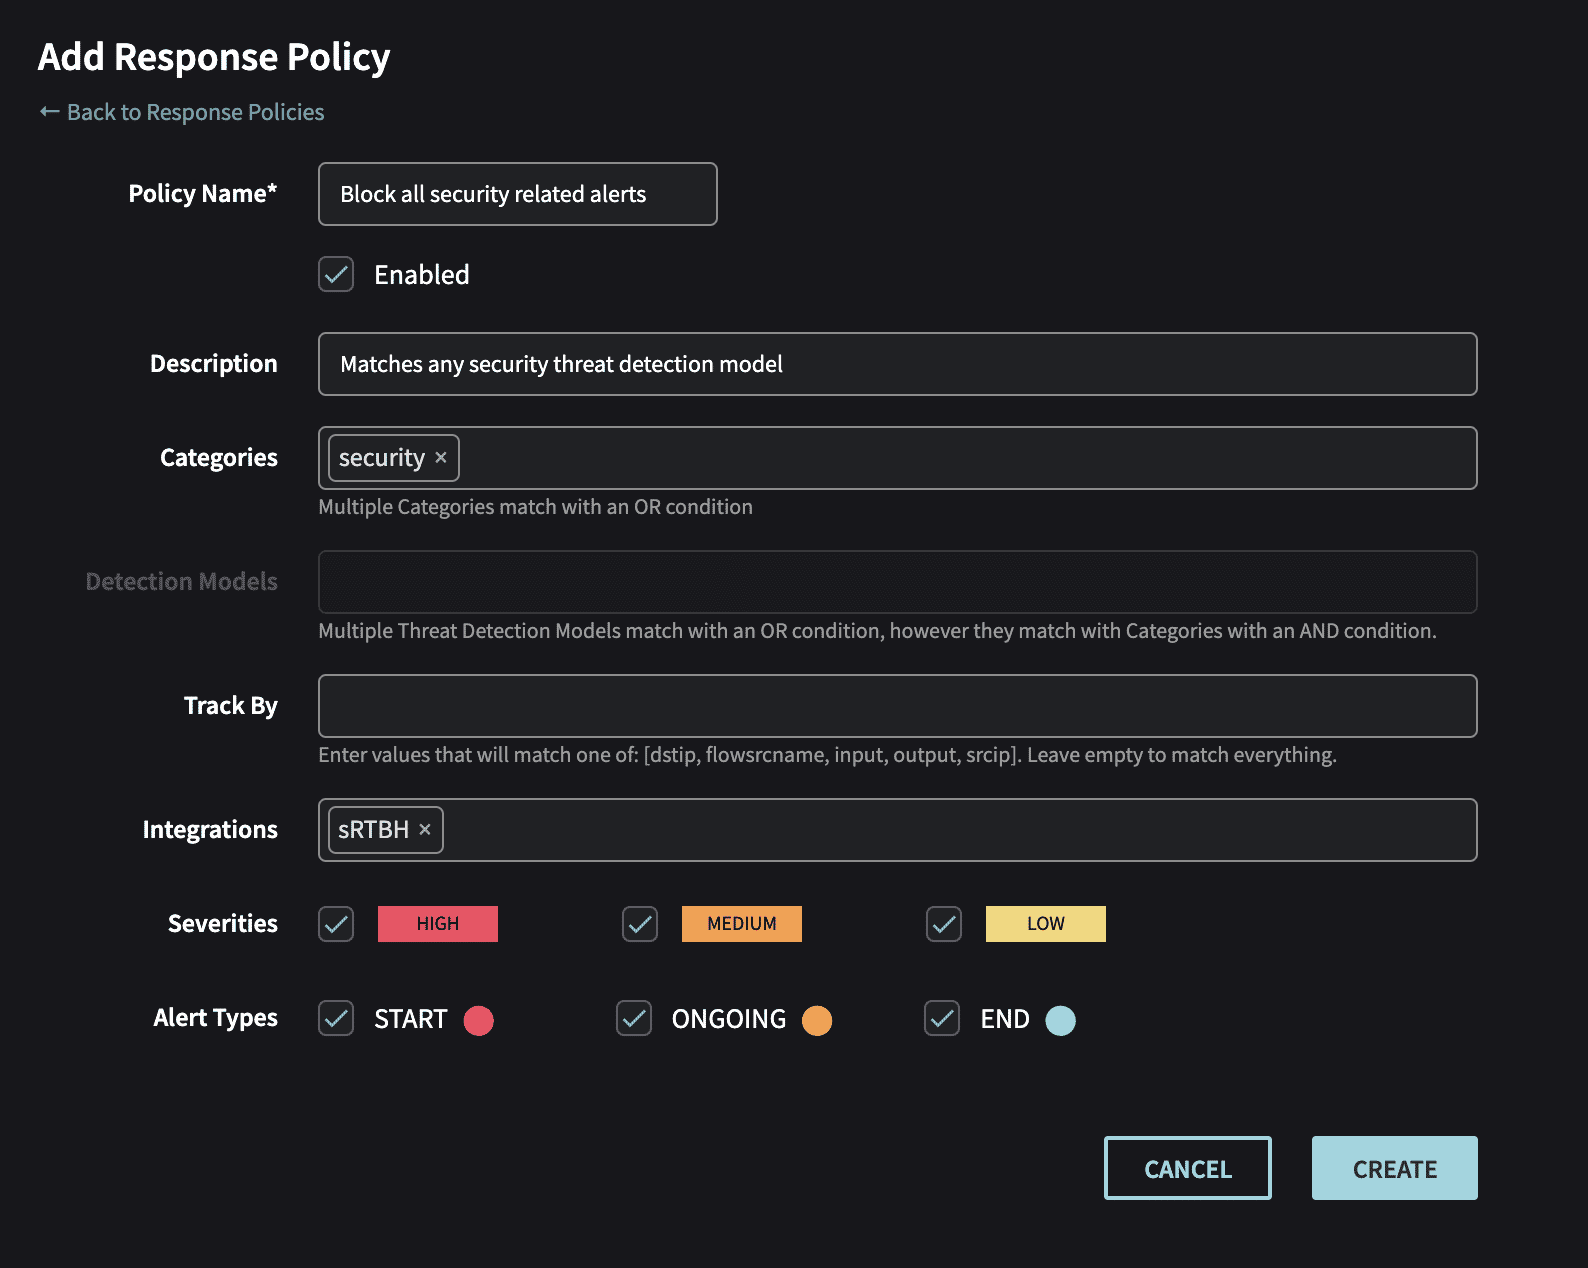
- Create Response Policy in the Netography portal
https://fusion.netography.com/ndr/response-policies
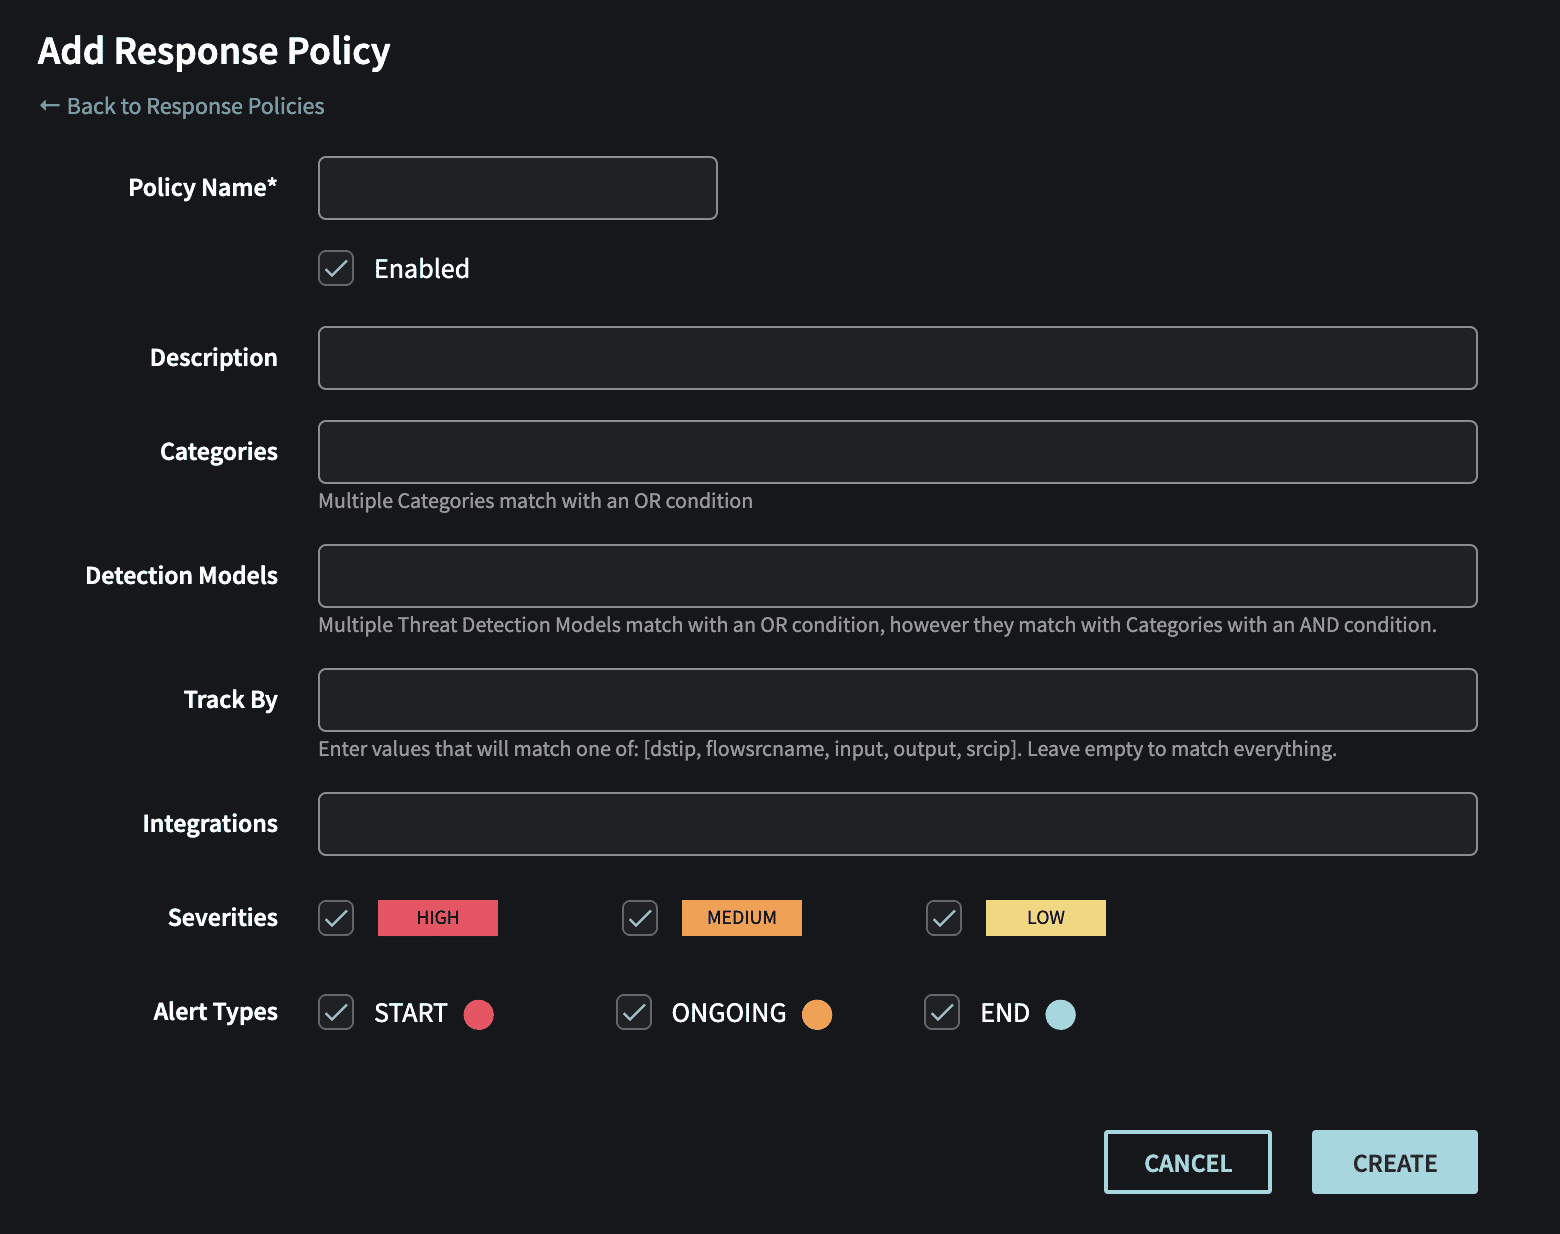
- Name – Response Policy name
- Description – A user friendly text to describe the rule
- Categories – Threat Detection Model categories that will match the rule (default: all)
- Detection Models – A list of detection models that will match the rule (default: all)
- Track By – A list of algorithm tracks that will match the rule (default: all)
- Integrations – One or more integrations that will be notified when this rule matches
- Severities – Which severity(s) that will match the rule
- Alert Types – Which alert state that will match this rule
As we said earlier, this is one of MANY configurations. If you’d like help with RTBH setup or a different configuration, please reach out to us at [email protected]. If you’d like to learn more about how Netography delivers DDoS protection, contact us for a free trial today.
Spoiler alert! Watch for our new blog post detailing how to use Flowspec over BGP for a more sophisticated routing of malicious traffic. If you’d like to be notified please sign up for upcoming blogs.